Shin-Yukari
  • Blog
  • Layout Description
  • Track Plan
  • LED Controller
  • Who am I?
  • Blog
  • Layout Description
  • Track Plan
  • LED Controller
  • Who am I?

​新ユーカリ駅

shin-yUkari station

N-gauge Japanese-style Model Train
​nゲージ鉄道模型

Tomytec Bus Automation (6)

20/6/2021

0 Comments

 
​Two years and five months ago, I managed to control a Tomytec bus by using an electromagnet under the road. I am now happy to report that I have finally been able to move the modules of the main street, bus interchange and Iwasehama station to the layout. All the wires for the bus control blocks, the hundreds of LED lights, the signals and the tracks are connected and everything seems to work fine. Well, not everything. There are still so many things to improve. These buses sometimes seem to have a mind of their own!
Next (major) step: finish the tram layout, and make sure that trams and buses don't collide! For that, I'll have to teach the Raspberry Pi Python application controlling the buses to talk to Rocrail! Interesting challenge.
0 Comments

Tomytec Bus Automation (5)

21/6/2020

0 Comments

 
​Summary and status on June 21, 2020.
0 Comments

Tomytec Bus Automation (4)

9/3/2020

0 Comments

 
​This is where the bus guide wire crosses the tram track:
Picture
0 Comments

Tomytec Bus Automation (3)

8/3/2020

0 Comments

 
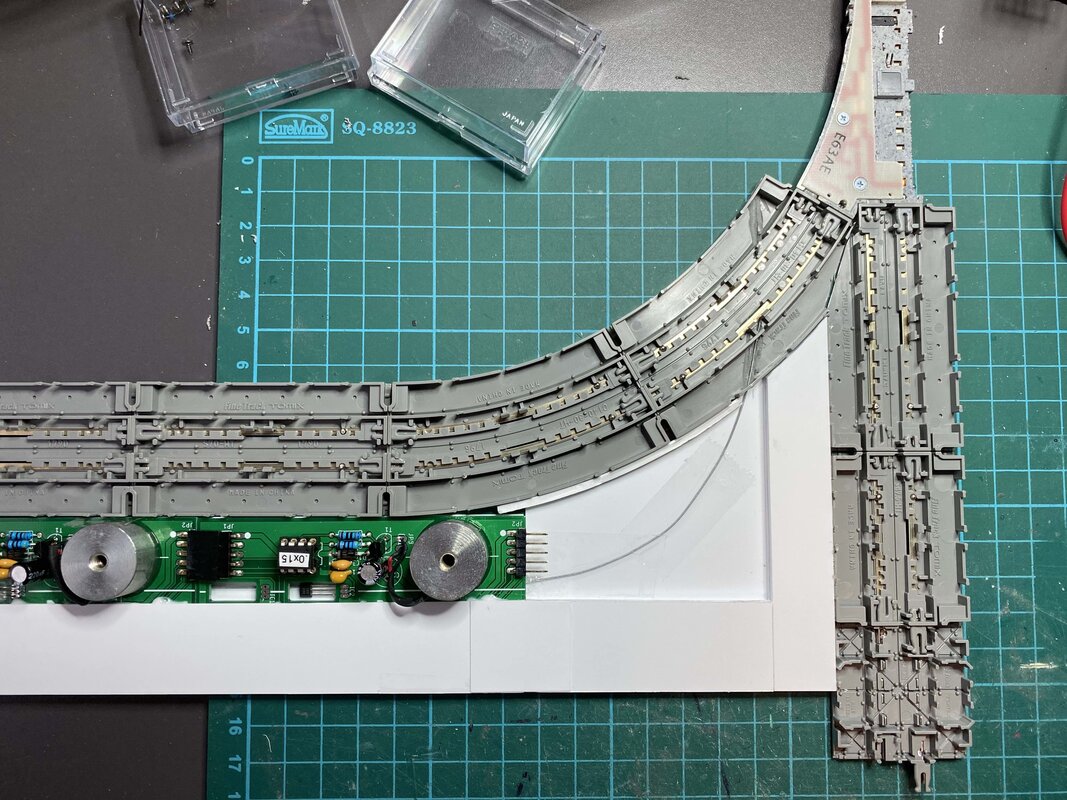
​Next step: the bus interchange. I have built a switch for the bus: a servo motor moves the guide wire towards one of the two positions.
​It works 🙂 
0 Comments

Tomytec Bus Automation (2)

2/2/2020

1 Comment

 
Today, I have started the integration of the system into the python application that runs on the raspberry pi (the same one that controls all the LEDs on the layout).
I have added a screen to control the busses, it looks like that:
Picture
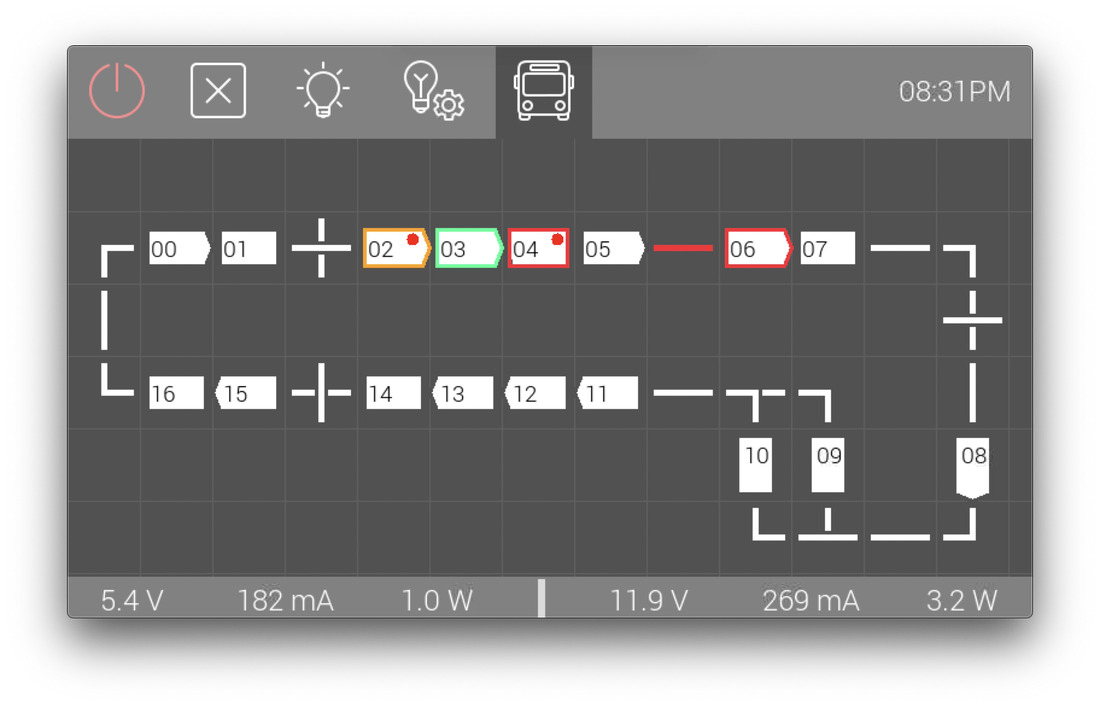
Each bus block is a white rectangle. The block is highlighted
  • in red if there is a bus arriving or stopped inside
  • in yellow if the bus inside has stopped because of a traffic jam
  • in green if the bus is departing
For bus blocks that are bus stops, there is a timer that shows how long the bus will stop there.
The application makes sure that there is no collision. The video below shows the results of very the first test:
1 Comment

Tomytec Bus Automation

28/1/2020

0 Comments

 
For more than a year now I am trying to control the Tomytec busses (fitted with a BM-01, BM-02 or BM-03 motor). My ultimate goal is to make the street at the centre of my layout look like this:
There will be
  • Two bus lanes (one in each direction), with busses following each other and queuing at the bus stops and traffic lights.
  • Two car lanes, with all cars stopped because of the traffic.
  • The tram lane at the middle.
I have made significant progress in the past weeks and I am now able to
  • reliably detect the busses using hall sensors (placed just below the guiding wire)
  • stop the busses using electromagnets on the right side of the guide wire (the Tomytec busses detect the magnetic field and stop until it is switched off).
Under the bus lane, I will place “bus block” control units (I have built twenty of them so far) wherever I want the bus to (potentially) stop. This is what two bus blocks look like (seen from the bottom):
Picture
They will all be connected to a Raspberry Pi, which will be able to control the traffic flow.
All of this is still under development, but this weekend I have been able to connect eight bus blocks, and this is the result (that I find really encouraging):
0 Comments

Tomytec bus system: Using an electromagnet to stop the bus

23/1/2019

1 Comment

 
Picture
I am studying how to automate the Tomytec bus system. There are many other blog posts describing how magnets are used to change the bus speed and temporarily stop the bus.
Here, I used an electromagnet placed under the track to stop the bus. As the electromagnet can be powered on or off, I will be able to remotely control the bus stop.
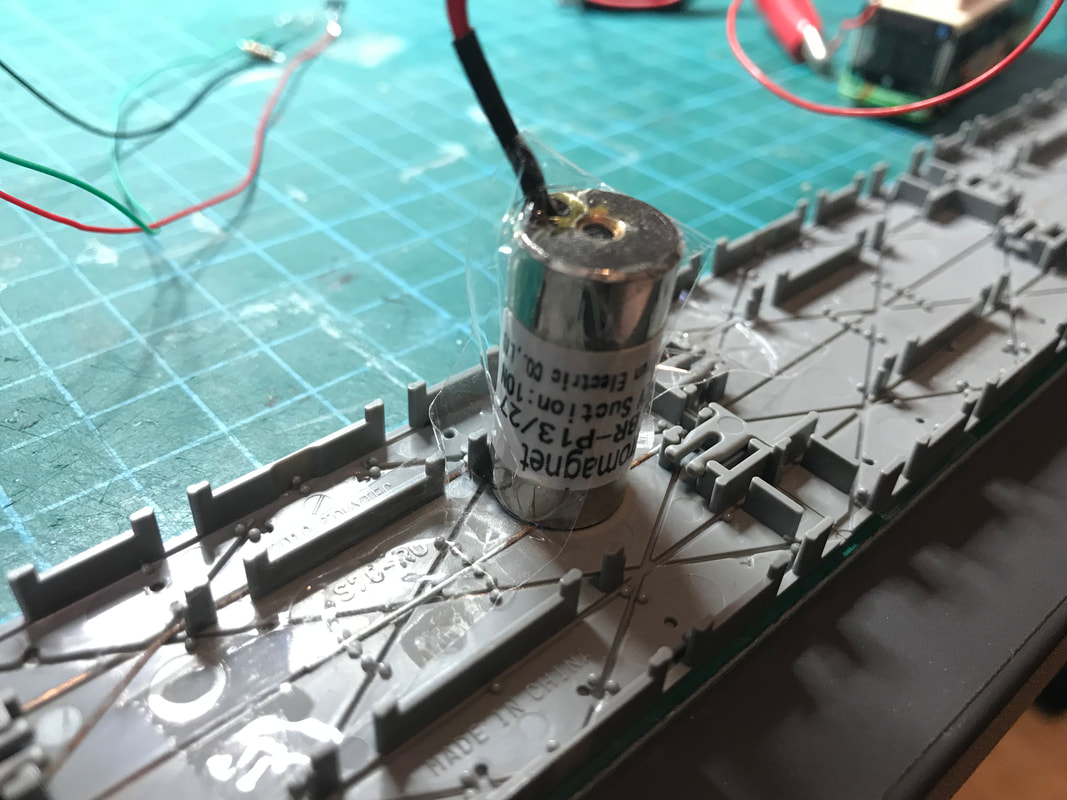
In this first test, I used a 13x27 12V 1W 10N (size 13x27mm, 12 volts, 1 watt, 10 newton force) electromagnet that can easily be purchased from AliExpress (look for solenoid, electromagnet, or follow this link). Its power consumption is about 100mA, which is reasonable, and the heat dissipation is not too high.
The bus stops when the electromagnet is powered, then restarts when I switch off the power supply.
1 Comment

    Categories

    All
    3D Printing
    Buildings
    DCC
    Electronics
    Kato
    Portram
    Rocrail
    Scenery
    Tomix
    Tomytec
    Tomytec Bus System

    Latest recap videos

    Archives

    January 2026
    December 2025
    November 2025
    September 2025
    August 2025
    July 2025
    May 2025
    January 2025
    December 2024
    September 2024
    August 2024
    April 2024
    March 2024
    February 2024
    November 2023
    October 2023
    September 2023
    August 2023
    July 2023
    June 2023
    May 2023
    April 2023
    March 2023
    February 2023
    January 2023
    December 2022
    November 2022
    October 2022
    September 2022
    August 2022
    June 2022
    May 2022
    April 2022
    March 2022
    February 2022
    January 2022
    December 2021
    November 2021
    October 2021
    September 2021
    August 2021
    July 2021
    June 2021
    May 2021
    April 2021
    January 2021
    September 2020
    August 2020
    July 2020
    June 2020
    April 2020
    March 2020
    February 2020
    January 2020
    October 2019
    September 2019
    August 2019
    July 2019
    June 2019
    May 2019
    April 2019
    March 2019
    February 2019
    January 2019
    December 2018
    November 2018
    October 2018
    September 2018
    August 2018
    July 2018
    May 2018
    April 2018
    March 2018
    February 2018
    January 2018
    October 2017
    July 2017
    November 2016
    October 2016
    August 2016
    March 2016
    September 2015

    RSS Feed

Powered by Create your own unique website with customizable templates.